
Please Choose Your Language
Views: 271 Author: XS Traffic Facilities Publish Time: 2026-09-15 Origin: Site


Content Menu
● Why Accessible Mid-Block Crosswalks Matter
● The Essential Elements of an Accessible Crosswalk
>> Continuous Pedestrian Travel Path
>> Curb Ramps and Blended Transitions
>> Detectable Warning Surfaces
● Pedestrian Pushbuttons and Accessible Signals
>> Common Pushbutton Placement Problems
● Improving Driver Visibility at Mid-Block Crosswalks
>> High-Visibility Crosswalk Markings
>> Signs, Beacons, and Lighting
● How Road Reflectors Improve Crosswalk Approaches
>> Road Reflector Selection Guide
>> Conventional Reflectors vs. Solar Road Studs
● Practical Site Assessment Before Installation
>> Step 1: Identify Pedestrian Demand
>> Step 2: Review Roadway Conditions
>> Step 3: Confirm the Full Accessible Route
>> Step 4: Choose a Complete Visibility Package
>> Step 5: Test Products Before Large-Scale Installation
● Common Mid-Block Crosswalk Design Mistakes
● Summary
>> What is an ADA-compliant mid-block crosswalk?
>> Are road reflectors required at every mid-block crosswalk?
>> What is the difference between a road reflector and a solar road stud?
>> Why are detectable warning surfaces needed at curb ramps?
>> How should pedestrian pushbuttons be installed?
A well-designed ADA-compliant mid-block crosswalk is more than painted pavement markings. It is a connected pedestrian-safety system that helps people cross streets with greater confidence while making the crossing easier for drivers to recognize in daylight, rain, and darkness.
For city planners, road contractors, parking-facility managers, developers, and traffic-safety distributors, an effective mid-block crossing combines accessible pedestrian routes, curb transitions, tactile warnings, clear markings, suitable traffic-control devices, and durable nighttime delineation. Shenzhen Xingsheng Traffic Facilities Co., Ltd. provides road reflectors and customized traffic-safety products for streets, highways, toll stations, parking areas, and other roadway environments.
> Note: This article is intended as a practical planning guide. Every crossing project should be reviewed according to applicable local regulations, roadway conditions, accessibility requirements, and engineering assessments.
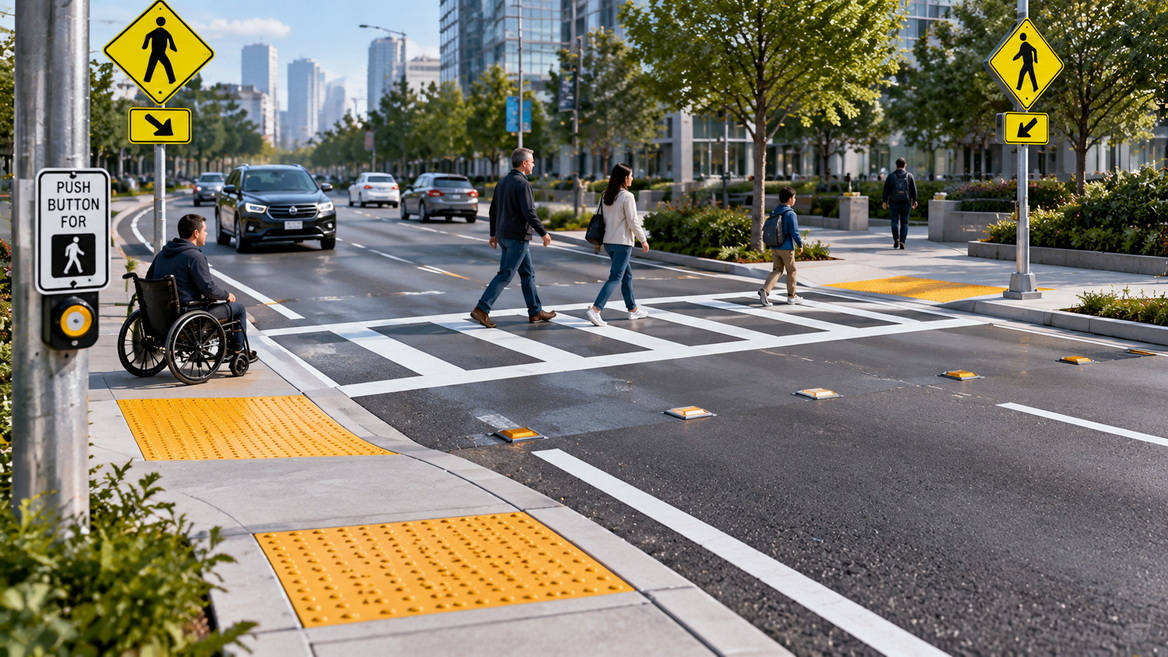
A mid-block crosswalk is a designated pedestrian crossing located between road intersections. These crossings can improve access where pedestrians naturally need to cross, such as near schools, transit stops, hospitals, shopping centers, industrial parks, residential communities, campuses, parking lots, and toll-station service areas.
However, a visible crossing is not automatically an accessible crossing. Painted stripes may tell drivers where pedestrians are expected to walk, but they may not provide a usable route for a wheelchair user, someone using a walker, or a pedestrian with low vision. Similarly, a curb ramp without tactile warning features may not give a person using a white cane adequate notice that they are entering a vehicular area.
A successful mid-block crossing should address four core priorities:
- A continuous and usable pedestrian route from one side of the road to the other.
- Clear tactile and visual cues at the roadway edge.
- High driver awareness during daytime, nighttime, rain, glare, and changing weather.
- Appropriate traffic control based on traffic speed, roadway geometry, pedestrian demand, and local project requirements.
When these elements work together, the crossing becomes easier to understand for pedestrians and more noticeable for drivers.
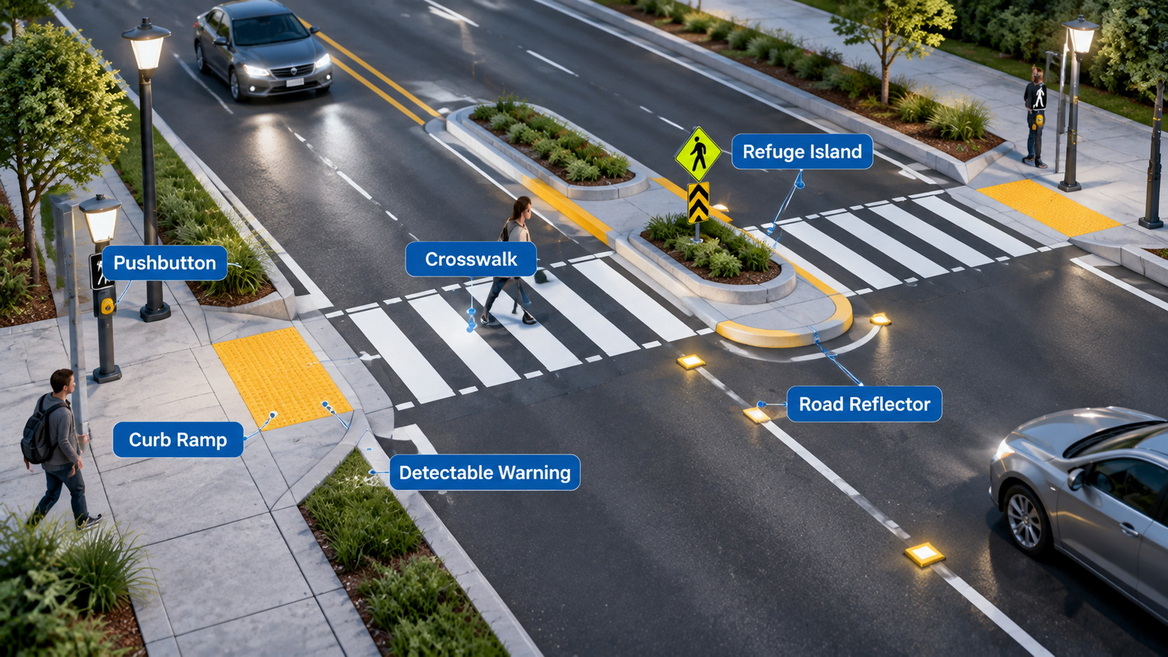
An accessible crosswalk should be planned as a complete travel path rather than a collection of separate products. The sidewalk, ramp, roadway crossing, median refuge area, and opposite sidewalk should all work as one connected system.
| Crosswalk Element | Main Purpose | Key Planning Question |
|---|---|---|
| Pedestrian access route | Supports continuous pedestrian movement | Can users travel from one side of the street to the other without barriers? |
| Curb ramp or blended transition | Connects the sidewalk to the roadway | Is the transition smooth, aligned, and suitable for mobility devices? |
| Detectable warning surface | Warns pedestrians of the roadway edge | Is there a clear tactile signal before entering vehicle traffic? |
| Crosswalk markings | Defines the intended pedestrian crossing zone | Are the markings easy for drivers to see and maintain? |
| Pedestrian pushbutton | Allows pedestrians to request a crossing phase | Is the pushbutton easy to reach and operate? |
| Audible and vibrotactile signals | Supports pedestrians who cannot rely only on visual signals | Does the crossing provide accessible information when signals are used? |
| Road reflectors | Improves nighttime lane and crossing delineation | Are reflectors suitable for traffic load, pavement type, and weather conditions? |
The pedestrian route should begin at the sidewalk approach and continue across the full road width. It should also remain usable through any median, refuge island, or central divider.
A crossing route should be free from obstacles such as utility poles, signposts, drainage grates, parked vehicles, landscaping, construction barriers, and uneven pavement. Narrow sidewalks can also create difficulties for wheelchair users, parents with strollers, delivery workers, and pedestrians walking side by side.
When reviewing a mid-block crossing, inspect the full path in both directions:
1. Sidewalk approach to the crossing.
2. Curb ramp or blended transition.
3. Tactile warning area.
4. Marked crosswalk zone.
5. Median or refuge island, if included.
6. Opposite-side curb ramp.
7. Exit route to the connected sidewalk, pathway, bus stop, parking area, or building entrance.
A crossing should guide pedestrians naturally toward the intended route. Poorly aligned ramps can unintentionally direct people toward moving traffic, drainage areas, or unmarked pavement.
Curb ramps and blended transitions provide the connection between sidewalk level and roadway level. They are especially important for pedestrians using wheelchairs, walkers, canes, mobility scooters, strollers, or carts.
A good curb transition should be smooth, stable, slip-resistant, and aligned with the crossing direction. It should also avoid excessive slope changes, ponding water, loose surfaces, and abrupt edges.
The placement of the ramp matters as much as the ramp itself. If the ramp is angled away from the marked crossing, pedestrians may be guided into a vehicle lane instead of toward the protected crossing path.
For mid-block crossings, ramps or blended transitions should be provided on both sides of the street. If the crossing includes a median refuge island, the island should also provide a usable pedestrian path.
Detectable warning surfaces are tactile panels with raised truncated domes. They provide an important physical cue that the pedestrian is leaving the sidewalk environment and approaching a roadway.
These surfaces are particularly valuable for people with visual impairments. The dome pattern can be felt underfoot and detected with a cane, helping pedestrians recognize the boundary between a pedestrian route and a vehicular route.
A practical detectable warning installation should consider:
- Clear visual contrast with surrounding pavement.
- Correct placement at the edge of the curb transition.
- Full coverage across the pedestrian path.
- Secure installation that resists lifting, cracking, or separation.
- Durable performance under rain, sunlight, temperature changes, and pedestrian traffic.
- Drainage design that prevents standing water near the curb ramp.
The warning surface should remain noticeable after years of use. Fading colors, damaged panels, loose edges, or poor drainage can reduce both safety and usability.
Where a mid-block crossing includes a pedestrian signal, pedestrian hybrid beacon, or other activated crossing device, the pushbutton location is critical.
A pedestrian should be able to approach the pushbutton from a stable surface, reach it without stepping into the roadway, and activate it without excessive force or complicated movement. The button should also be positioned close enough to the correct crosswalk so that pedestrians clearly understand which crossing it controls.
A well-planned pushbutton area should provide:
- A clear and level approach area.
- Enough space for a wheelchair or mobility scooter.
- Easy reach from the pedestrian route.
- Correct alignment with the associated crosswalk.
- Clear instructions where needed.
- Accessible visual, audible, and vibrotactile crossing information when applicable.
Audible and vibrotactile features can help communicate crossing information to pedestrians who cannot depend solely on visual walk signals. These details are especially important at busy roads, complex crossings, transit areas, hospitals, and public facilities.
Poor pushbutton placement can reduce the value of an otherwise well-designed crossing. Frequent problems include:
- Buttons placed too far from the curb ramp.
- Buttons installed behind landscaping, utility poles, or signposts.
- Uneven ground or steep slopes around the pushbutton.
- Limited space for wheelchair turning or maneuvering.
- Pushbuttons that face the wrong direction.
- Confusing layouts where one button appears to control another crosswalk.
A site inspection before installation can prevent these avoidable issues.
Pedestrians need a clear path. Drivers need early recognition. A crossing should be visible well before a vehicle reaches it, especially at night or under poor weather conditions.
Factors that can reduce driver visibility include:
- High vehicle speeds.
- Road curves or hills.
- Heavy rain, fog, snow, or dust.
- Roadside advertising and visual clutter.
- Shadows from trees, buildings, or elevated structures.
- Faded pavement markings.
- Poor street lighting.
- Oncoming headlights and glare.
- Large vehicles blocking the view of pedestrians.
A layered visibility strategy can help make the crossing more recognizable.
High-visibility markings are designed to stand out more clearly than simple parallel lines. Ladder-style or continental-style crosswalk markings can create a larger visual target for approaching drivers.
Crosswalk markings should be selected based on road conditions, pavement material, expected traffic volume, and maintenance planning. A marking that performs well in a dry parking area may wear quickly on a high-traffic roadway.
Markings should be inspected regularly for fading, cracking, peeling, tire wear, contamination, and loss of nighttime visibility.
Depending on the project environment, a mid-block crossing may also use advance warning signs, yield lines, pedestrian crossing signs, flashing devices, pedestrian hybrid beacons, or dedicated street lighting.
These elements should be selected based on roadway speed, traffic volume, pedestrian activity, sight distance, local requirements, and professional engineering review.
A pedestrian hybrid beacon can be particularly useful at selected unsignalized crossings where a higher level of driver control is needed. However, it should be integrated with proper markings, signs, accessible pedestrian features, and operational planning.
Lighting is another important consideration. A streetlight located far from the actual crossing may illuminate the roadway but leave pedestrians in shadow. Effective crossing lighting should improve the visibility of pedestrians waiting at the curb and moving through the crossing area.

Road reflectors, also called raised pavement markers, reflective road markers, road studs, or pavement reflectors, can help drivers identify lane boundaries, traffic islands, stop lines, channelized areas, and crosswalk approaches.
They are especially useful where roadway markings need additional nighttime delineation. When vehicle headlights reach the reflector, the reflective surface returns light toward the driver and makes the roadway alignment easier to recognize.
Road reflectors should be used as part of a complete traffic-safety plan. They do not replace crosswalk markings, signs, accessible ramps, lighting, or traffic-control devices. Instead, they can strengthen the visibility of these components.
| Selection Factor | Why It Matters |
|---|---|
| Pavement material | Asphalt, concrete, brick, and coated surfaces may require different installation methods |
| Traffic load | Heavy trucks, buses, and repeated axle loads require durable materials and secure bonding |
| Road speed | Higher-speed roads may need stronger advance delineation and more visible traffic guidance |
| Weather conditions | Rain, heat, dust, snow, and freeze-thaw conditions affect product performance |
| Snowplow activity | Snowplow routes may require recessed, protected, or specially designed marker systems |
| Reflective color | Color should support the road layout, traffic direction, and local marking convention |
| Maintenance capability | Every project should consider inspection, cleaning, replacement, and resurfacing plans |
| Installation method | Adhesive, mechanical anchoring, recessing, and surface preparation influence long-term stability |
For projects in streets, highways, toll stations, industrial areas, and parking lots, the product specification should match the actual site conditions.
Shenzhen Xingsheng Traffic Facilities Co., Ltd. can support customers with customized road reflector and traffic-safety product solutions. OEM and ODM options may include customized colors, housing materials, dimensions, logos, packaging, product labeling, and application-specific configurations.

Conventional road reflectors and solar road studs both improve visibility, but they work differently.
| Product Type | How It Works | Typical Application |
|---|---|---|
| Conventional road reflector | Reflects vehicle headlight beams back toward the driver | Lane lines, road edges, parking lots, toll stations, channelization areas |
| Solar road stud | Uses solar energy to power active LED illumination at night | Low-light roads, curves, crossings, landscaping boundaries, parking areas |
| Raised pavement marker | Creates physical and visual pavement delineation | Roadway lanes, merges, traffic islands, edge lines, parking facilities |
| Recessed reflector | Installed below or close to pavement surface | Locations exposed to snowplows or demanding traffic conditions |
The best option depends on the expected traffic load, weather, pavement surface, nighttime visibility requirement, road maintenance schedule, and local installation practice.
The most reliable crossing projects begin with a site assessment before product selection and construction.
Observe who uses the crossing and when. Consider morning school periods, shift changes, transit arrivals, shopping peaks, events, hospital visiting hours, and evening activity.
Pedestrian demand can vary significantly throughout the day. A crossing that appears lightly used at noon may be heavily used during morning or evening peak periods.
Document the physical characteristics of the location:
- Number of lanes and direction of travel.
- Posted speed and observed vehicle speed.
- Traffic volume and heavy-vehicle activity.
- Sight distance from both directions.
- Road curvature and vertical grade.
- Driveways, bus stops, parking entrances, and loading zones.
- Existing signs, signals, and pavement markings.
- Streetlight locations and nighttime visibility.
- Pavement condition, drainage, and surface texture.
- Median or refuge island opportunities.
Walk the pedestrian route as if you were using a wheelchair, walker, stroller, cane, or mobility scooter.
Look for obstacles, uneven surfaces, drainage gaps, poor ramp alignment, narrow pathways, sudden slope changes, and blocked pushbuttons. The route should feel clear and predictable from the pedestrian's perspective.
Select crosswalk markings, signs, lighting, beacons, road reflectors, and other devices based on the site's actual risks.
For example, a parking-lot crossing may benefit from high-visibility pavement markings, wheel stops, warning signs, and reflective road markers. A busy arterial road may require a more comprehensive solution that includes advance signage, active warning devices, refuge space, improved lighting, and durable pavement delineation.
For major projects, export orders, or customized road-safety products, request samples before approving mass production.
A pilot installation can help confirm:
- Adhesive compatibility with the pavement.
- Product visibility during nighttime conditions.
- Performance under vehicle loading.
- Resistance to rain, heat, dust, and temperature changes.
- Suitability for local installation equipment.
- Packaging and labeling accuracy.
- Product appearance and branding requirements.
This process can reduce installation risk and improve consistency across large projects.
Many crosswalk problems can be avoided through early coordination between project owners, engineers, contractors, installers, and product suppliers.
The most common mistakes include:
- Treating pavement markings as the only crosswalk-safety measure.
- Installing curb ramps that do not align with the marked crossing.
- Omitting detectable warning surfaces or allowing them to deteriorate.
- Placing pushbuttons where they are difficult to reach.
- Using road reflectors as a substitute for required traffic-control devices.
- Ignoring nighttime visibility during the design stage.
- Selecting products without considering road surface, traffic load, climate, or snowplow exposure.
- Failing to inspect markings, reflectors, signs, and lighting after installation.
- Ordering customized traffic-safety products without approving physical samples and written specifications.
- Overlooking drainage around curb ramps, islands, and pavement markers.
The most effective approach is to prepare a complete crossing specification. This document should include pedestrian-access requirements, traffic-control layout, marking details, product specifications, installation instructions, inspection standards, and maintenance responsibilities.
A mid-block crosswalk should provide more than a place to cross the road. It should create a clear, accessible, visible, and durable connection between two pedestrian destinations.
The strongest crosswalk designs combine continuous pedestrian access, aligned curb transitions, detectable warning surfaces, properly positioned pushbuttons, visible markings, suitable lighting, and roadway delineation products matched to the real site environment.
For streets, highways, toll stations, parking lots, industrial facilities, and customized traffic-safety projects, Shenzhen Xingsheng Traffic Facilities Co., Ltd. provides road reflectors, solar road studs, raised pavement markers, traffic-safety accessories, and OEM/ODM manufacturing support. A complete project brief should include the road type, traffic load, pavement material, weather conditions, required reflective color, installation method, expected quantity, packaging requirements, and customization needs.
An ADA-compliant mid-block crosswalk is designed to provide an accessible pedestrian route across a road. It generally includes usable curb ramps or blended transitions, tactile detectable warning surfaces, a continuous crossing route, and accessible signal features where pedestrian-activated traffic control is installed.
Road reflectors are not required at every crossing. They are a visibility-support product that can help drivers identify lanes, crossing approaches, road edges, and channelized areas at night. Their use should be based on local requirements, road conditions, traffic volume, speed, weather, and project safety goals.
A road reflector uses vehicle headlights to reflect light back toward drivers. A solar road stud collects solar energy during the day and uses LED lighting to create active nighttime illumination. Solar road studs are often selected for low-light locations, while conventional reflectors are widely used for lane delineation and road marking support.
Detectable warning surfaces provide a tactile signal that a pedestrian is entering a roadway environment. Their raised dome pattern can be detected underfoot or with a cane, helping people with visual impairments identify the transition from sidewalk to vehicle traffic.
Pedestrian pushbuttons should be easy to reach from the pedestrian route and placed close to the crosswalk they control. The surrounding area should provide stable ground, adequate maneuvering space, proper orientation, and clear access for pedestrians using wheelchairs, walkers, canes, or strollers.
1. [Carmanah — Mid-Block Crosswalk Accessibility Requirements Map]
2. [U.S. Access Board — Public Right-of-Way Accessibility Guidelines, Complete Text]
3. [U.S. Access Board — PROWAG Technical Requirements]
4. [Federal Highway Administration — MUTCD 11th Edition, Part 4]
5. [Federal Highway Administration — MUTCD 11th Edition Information Page]
6. [Carmanah — Considerations for Ensuring Accessible, ADA-Compliant Crosswalks]
7. [Federal Register — Accessibility Guidelines for Pedestrian Facilities in the Public Right-of-Way]


